JSol’Ex 3.0.0 is out!
14 April 2025
Tags: solex jsolex solar astronomy
After dozens of hours of work, I’m happy to announce the release of JSol’Ex 3.0.0! This major release is a new milestone in the development of JSol’Ex, and it brings new features and improvements that I hope you will enjoy.
A bit of history
Since its inception as an educational project for understanding how the Sol’Ex works, JSol’Ex has grown into a powerful tool for processing and analyzing images captured with the Sol’Ex. However, it became very popular over time and started to be used outside the sole Sol’Ex community. In particular, it is now a tool of choice for many spectroheliographs owners.
I have always been keen on providing a user-friendly interface while keeping a good innovation pace. JSol’Ex was the first SHG software to offer:
-
automatic colorization of images
-
automatic detection of spectral lines
-
Doppler eclipse image, inverted image and orientation grid
-
automatic correction of the P angle
-
single click processing of Helium line images
-
embedded stacking
-
automatic trimming and compression of SER files
-
identifying what frame of a SER file matches a particular point of the solar disk
-
an optimal exposure calculator
-
automatic detection of redshifts
-
automatic detection and annotation of sunspots
-
automatic creation of animations of a single image taken at different wavelengths
-
a full-fledged scripting engine which allows creation of custom images, animations, etc.
-
support for home-made SHGs
-
and more!
-
All integrated into a single, easy to use, cross-platform application: no need for Gimp, ImPPG or Autostakkert! (but you can use them if you want to!).
For this new release, I wondered if I should change the name so that it better matches the new scope of the project, but eventually decided to keep it as it is, because it is already well known in the community and that changing it also implies significant amount of time spent on this that wouldn’t go into the new features.
Here comes JSol’Ex 3.0.0!
In addition to performance improvements and bugfixes, this release deserves its major version number because of many significant improvements.
Improved image quality
Better line detection
The first thing you may notice is the improved image quality. The algorithm to detect the spectral lines have been improved, which will result in a better polynomial detection and therefore a more accurate image reconstruction. This will be noticeable in images which have low signal, which is often the case in calcium.
Background removal
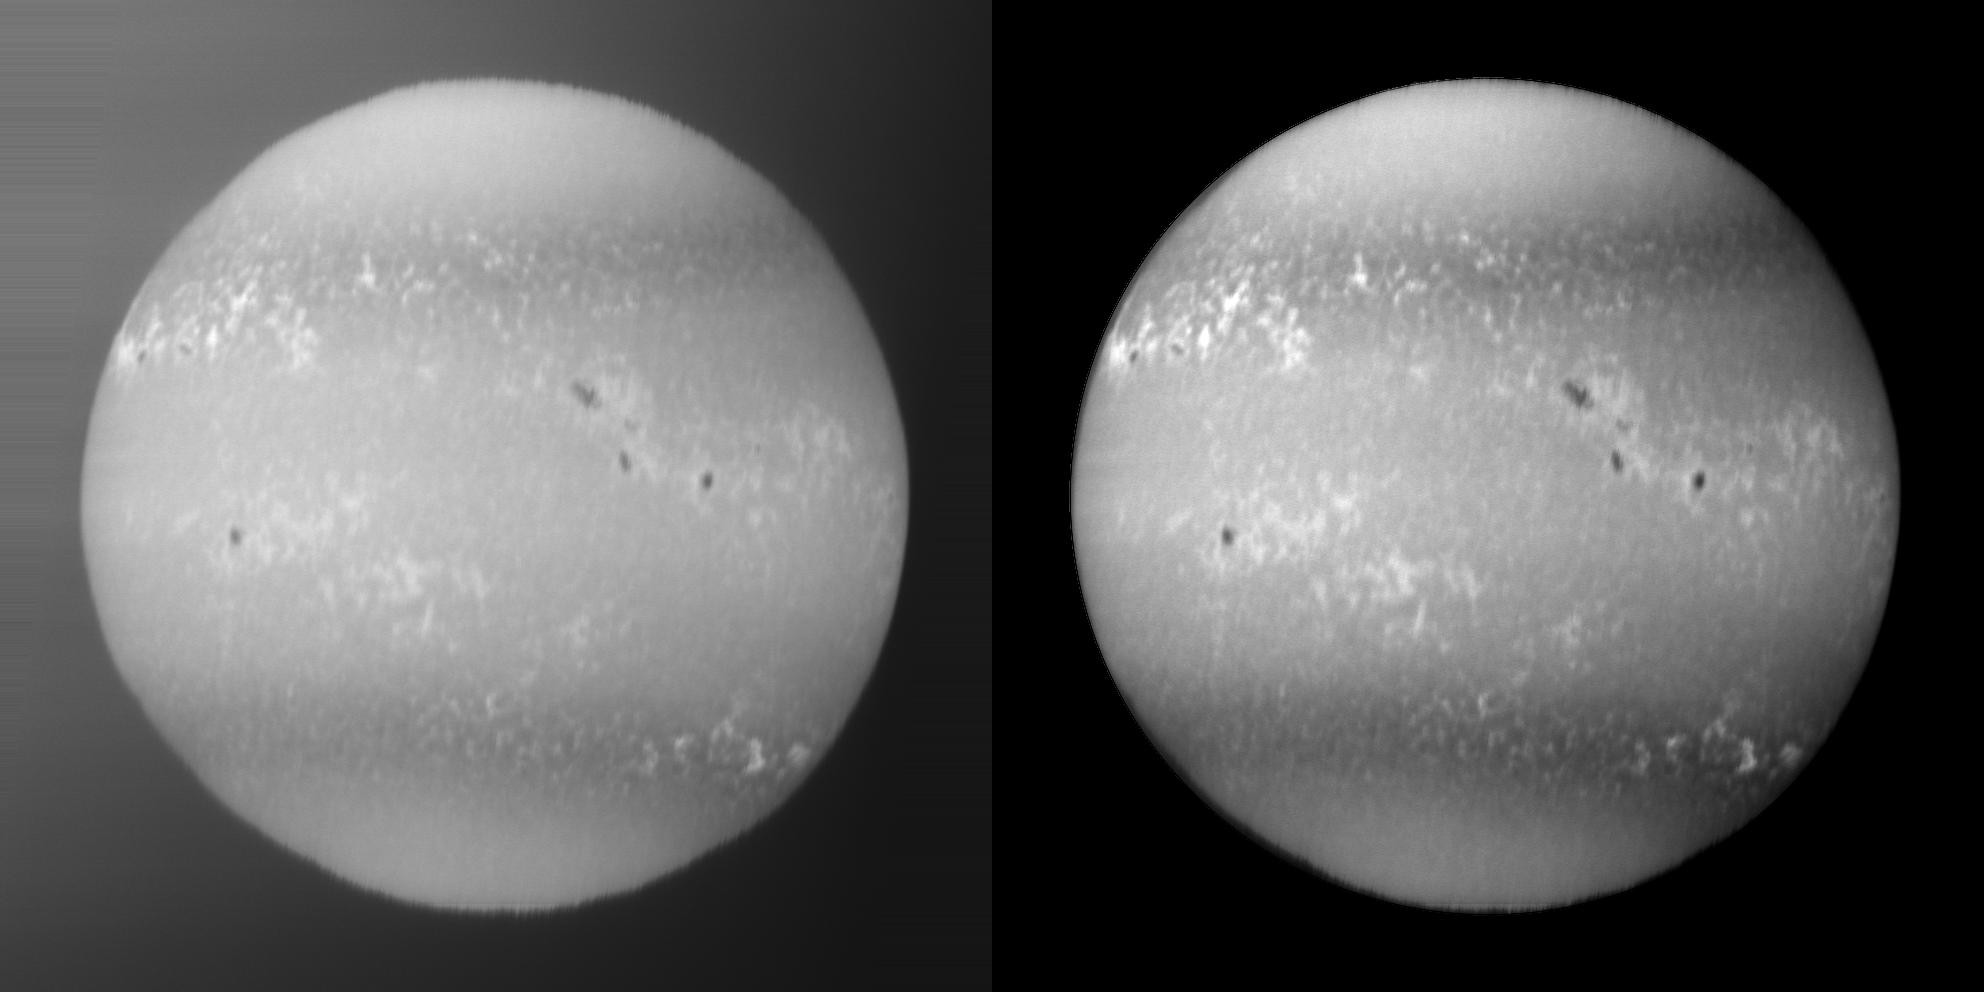
Next, a new background removal algorithm has been added. It is fairly common to have either internal reflections or light leaks in the optical path of a spectroheliograph. This results in images which are hard to process or not usable at all. This version of JSol’Ex is capable of removing difficult gradients. To illustrate this, here’s an image that a user with a Sunscan sent me:

The image on the left is unprocessed and shows important internal reflections. These are completely removed in the image on the right, processed automatically with JSol’Ex.
This background removal will only be applied to the "Autostretch" image, which is the default "enhanced" image that JSol’Ex is using, but it is also available as a standalone function in ImageMath scripts.
Physical flat correction
Another common issue with SHGs is the presence of vignetting, visible on the poles of the solar disk. The vignetting issue stems from the following factors, in the order of their impact:
-
the physical size of the SHG’s optical components — including the lens diameter, grating size, and slit length
-
the telescope’s focal ratio and focal length
-
the telescope’s own intrinsic vignetting (though this is rarely a significant factor)
For prebuilt SHGs like the MLAstro SHG 700, the size of the lens and grating is typically constrained by the housing design and cost limitations. As a result, vignetting often becomes an issue when using longer focal length telescopes,—especially when paired with a longer slit.
To fix this, JSol’Ex had until now the option to use artificial flat correction: the idea was basicaly to model the illumination of the solar disk via a polynomial and to apply a correction to the image. This works relatively well, but it can sometimes introduce some noise, or even bias the reconstruction on low-contrast images. On even longer slits, this artificial correction is not sufficient to remove the vignetting, so JSol’Ex 3 introduces the ability to use a physical flat correction.
The idea with a physical flat correction is to take a series of 10 to 20 images of the sun, using a light diffuser device at the entrance of the telescope, such as tracing paper, in order to diffuse light. The flat should be captured with the same cropping window as the one used for the solar images, but exposure will be longer, and possibly higher gain as well. The result is a SER file that JSol’Ex can use to create a model of the illumination of the disk, which can be used to correct the images.
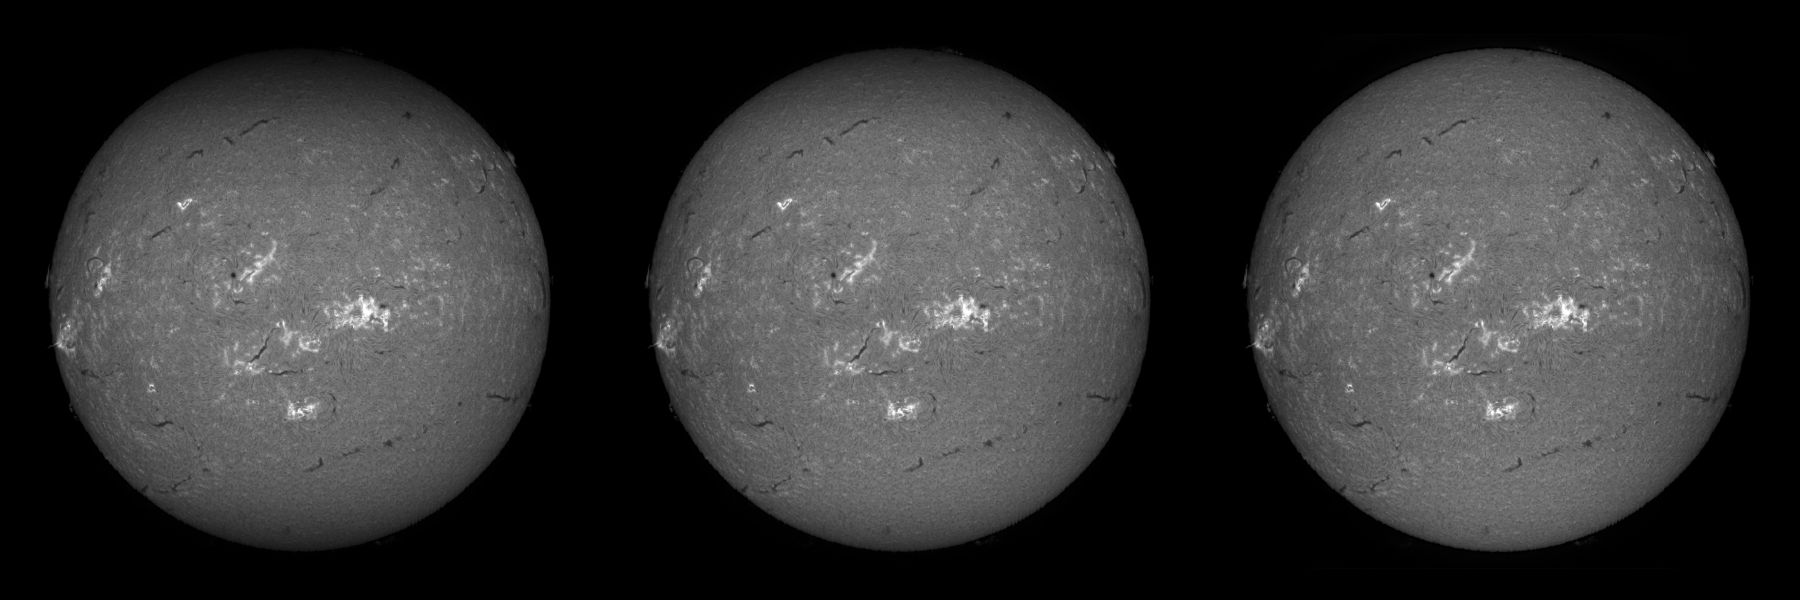
As an illustration, here’s a series of 3 images of the Sun, taken with a prototype of a 10mm slit:

The image on the left is done without any correction and shows very strong vignetting. The image in the middle is done with the artificial flat correction, improves the situation, but still shows some vignetting. The image on the right is done with the physical flat correction, which is much better and shows no vignetting at all.
Flats can be reused between sessions, as long as you use the same cropping window and the same wavelength.
The physical flat correction can also be used on images taken with a Sol’Ex, in particular for some wavelengths like H-beta which show stronger illumination of the middle of the solar disk.
|
Note
|
Flat correction is not designed to fix transversalliums: it has to apply low pass filtering to the image to compute a good flat, which will remove the transverse lines. To correct transversalliums, use the banding correction parameters. |
New Stretching Options
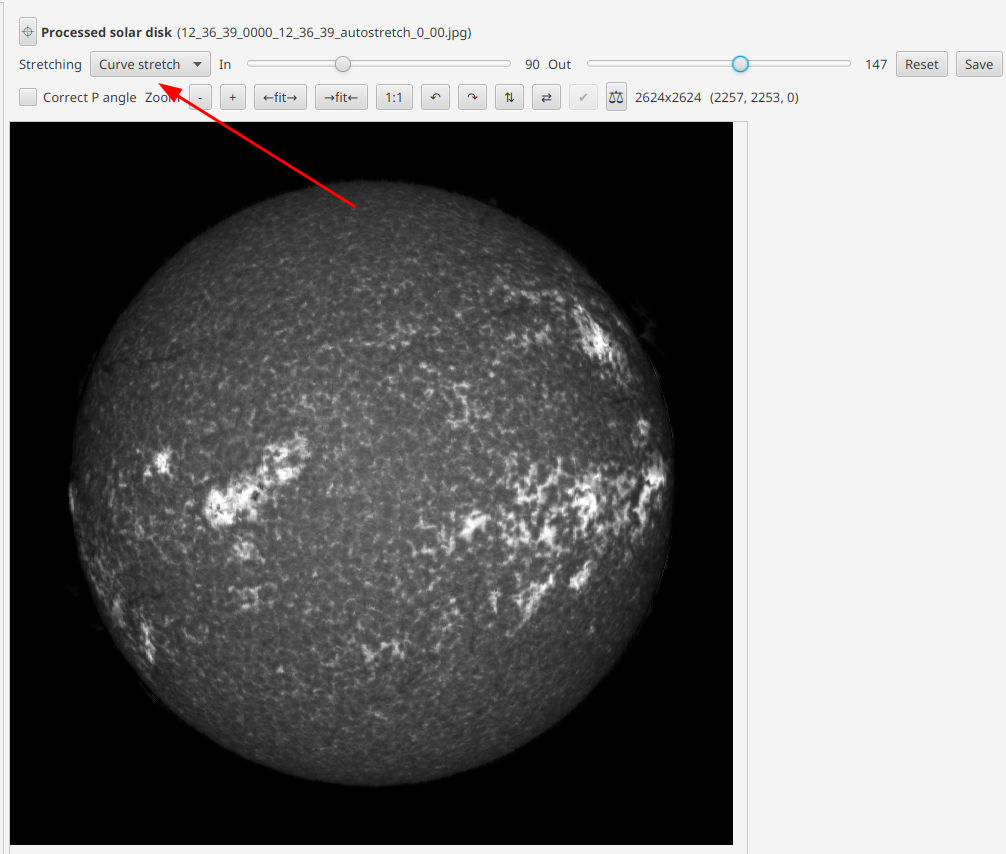
By default, JSol’Ex used to display images applying a linear stretch. Starting with this version, it is possible to select which stretching algorithm to use: linear, curve or no stretching at all.

Distance measurement tool
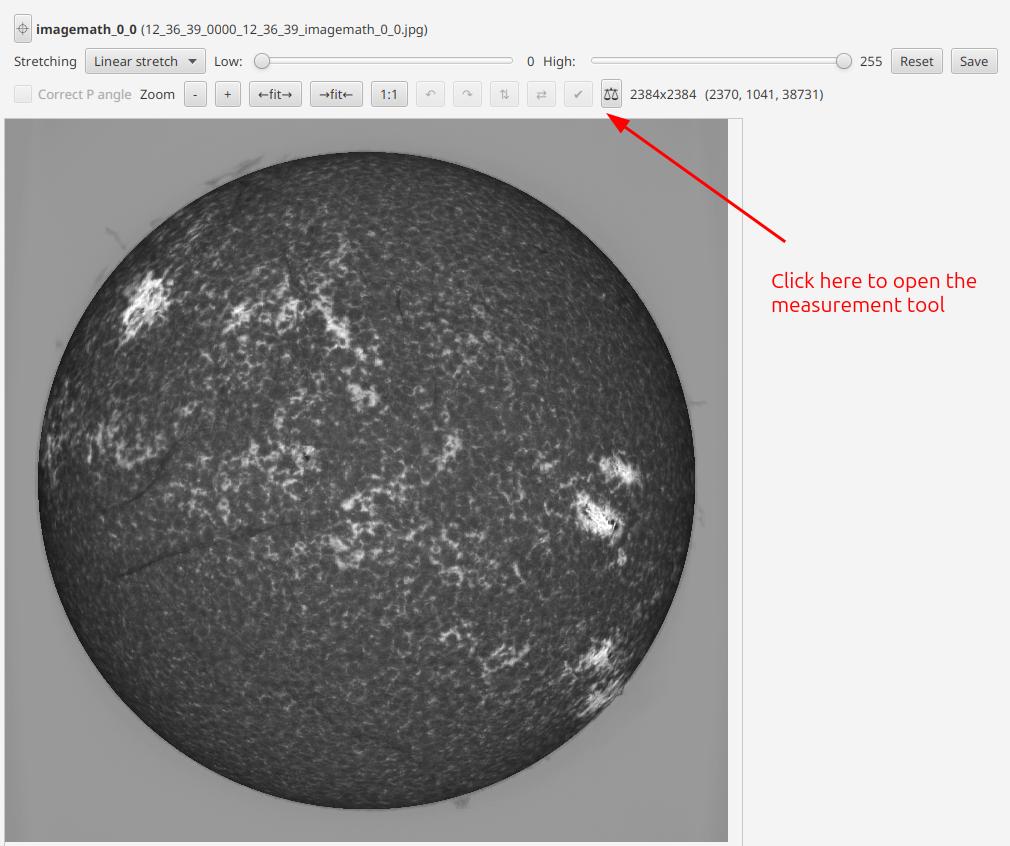
This version introduces a new tool to measure distances! This feature was suggested by Minh Nguyen from MLAstro, after seeing one of my images in Calcium H, which showed a very long filament:

This tool lets you click on waypoints to follow a path and make measurements on the disk, in which case the distances take the curvature into account, or outside the disk, for example to measure the size of prominences, in which case the distances are linear.

The measured distances are always an approximation, because it’s basically impossible to know at what height a particular feature is located, but it gives a good rough estimate.
New scripting features
Last but not least, this version significantly improves the scripting engine, aka ImageMath. While this feature is for more advanced users, it is an extremely powerful tool which lets you generate custom images, automatically stack images, create animations, etc.
In this version, the scripting engine has been rewritten to make it more enjoyable to use. It adds:
-
the ability to write expressions on several lines
-
the possibility to use named parameters
-
the ability to define your own functions
-
call an external web service to generate script snippets
-
the ability to import scripts into other scripts
As well as new functions. Let’s take a deeper look.
Declaring your own functions
You may have faced the situation where you wanted to apply the same operation to several images. For example, let’s imagine that you want to decorate an image with the observation details and the solar parameters.
Before, you would write something like this:
image1=draw_solar_params(draw_obs_details(some_image)
image2=draw_solar_params(draw_obs_details(some_other_image)
Now, you can define a function, let’s call it decorate, which will take an image and return the decorated image:
[fun:decorate img]
    result = draw_solar_params(draw_obs_details(img))

[outputs]
image1=decorate(some_image)
image2=decorate(some_other_image)
You can take a look at the documentation for more details.
Importing scripts
In the previous section we have seen how to define functions.
It can be useful to externalize these functions in a separate file, so that they can be reused in other scripts.
This is now possible with the import statement.
For example, let’s say you have a file called utils.math which contains the decorate function.
We can now import this file in our script:
[include "utils"]

[outputs]
image1=decorate(some_image)
image2=decorate(some_other_image)
This will import the utils.math file and make the decorate function available in the current script.
Named parameters
Named parameters are a new feature that allows you to pass parameters to functions by name, instead of by position. This is particularly useful for functions that take a lot of parameters, or when you want to make your code more readable.
For example, in the example above, we could have written:
[include "utils"]

[outputs]
image1=decorate(img: some_image)
image2=decorate(img: some_other_image)
The names of the parameters are documented here.
New functions
This version introduces a few new functions, which are available in the scripting engine:
-
bg_model: background sky modeling -
a2pxandpx2a: conversion between pixels and Angstroms -
wavelen: returns the wavelength of an image, based on its pixel shift, dispersion, and reference wavelength -
remote_scriptgen: allows calling an external web service to generate a script or images -
transition: creates a transition between two or more images -
curve_transform: applies a transformation to the image based on a curve -
equalize: equalizes the histograms of a series of images so that they look similar in brightness and contrast
And others have been improved:
-
find_shift: added an optional parameter for the reference wavelength -
continuum: improved function reliability, enhancing Helium line extraction
The transition function, for example, is capable of generating intermediate frames in an animation, based on the actual difference of time between two images, offering the ability to have smooth, uniform transitions between images.
This is how my partial solar eclipse animation was created!
Acknowledgements
I would like to thank all the users who have contributed to this release by reporting bugs, suggesting features, and testing the software. In particular, I would like to recognize the following people:
-
Minh Nguyen, MLAstro’s founder for his help with the background removal and flat correction algorithms, as well as the new distance measurement tool and review of this blog post
-
Yves Robin for his testing and improvement ideas
-
my wife for her patience, while I was going to bed late every night to work on this release
